前言
我这个人比较喜欢自♂由,而且喜欢新的东西,所以网上的 “XXX一键安装包” 我通常是无感的。既然是自己的长期生产环境那当然是越精致越好啦,自己安装既能“摆好位置”又能体验“船新版本”,强迫症救星,简直爽爆了——相信有这样想法的应该不只有我一人吧
可惜,网上不少的解决方案都是一键安装的,完整的手动安装教程又少,让我们这些爱折腾的多动症患者情何以堪!是时候有人站出来代表我们这一小撮人了。嗯、就是这样这篇教程就诞生了,在我经过两天的摸爬滚打后
注意:以下操作皆在root权限下
编译安装Nginx
首先安装依赖 yum -y install gcc zlib zlib-devel pcre-devel openssl openssl-devel
然后下载最新 nginx 源码并解压,位置任意,个人习惯放在 /usr/local/src。进入目录进行配置
wget http://nginx.org/download/nginx-1.16.0.tar.gz
tar -zxvf nginx-1.16.0.tar.gz
cd nginx-1.16.0

# 编译配置:指定安装路径(第一行)、指定运行nginx的用户和组(第三行)
./configure --prefix=/usr/local/nginx  \
--with-http_v2_module \
--with-http_ssl_module \
--user=www --group=www  \
如果配置没有任何错误,就开始编译安装 make && make install,没有error的话恭喜,下面进入nginx目录进行简单配置。首先简单修改 nginx/conf/nginx.conf 的两处用于后面的测试
# 设置nginx的用户和组,编译时设置过的话不用理
user www www;
#####
server {
    #设置自己想要的监听端口
    listen       233;
#####
nginx 默认的网站根目录为 nginx 下的 html 文件夹,为了避免以后出现权限问题,先把 html 文件夹权限交给我们设置的用户和组chmod -R www:www html
nginx 执行文件放在 nginx 目录下的 sbin 文件夹中,执行./nginx启动 nginx。如果你用的是有图形界面的系统,打开浏览器访问 localhost 看到“welcome to nginx”的话,那 nginx 部署成功了。如果用的是只有命令行交互的服务器还需要对外开放端口,这时候就要用到 centos7 的防火墙了(centos6以下用iptables,问谷歌吧)
systemctl status firewalld  #查看防火墙状态
systemctl start firewalld  #没开启的话开启
firewall-cmd --zone=public --add-port=233/tcp --permanent  #对外永久开放233端口
firewall-cmd --zone=public --remove-port=233/tcp --permanent  #对外永久关闭233端口
firewall-cmd --zone=public --list-ports  #查看对外开放的端口
firewall-cmd --reload  #修改过端口后记得重载
浏览器访问服务器的ip和端口,看到欢迎的话nginx就正式部署完了,下面再提下 nginx 的启动、停止与重启
./nginx  #打开 nginx
./nginx -s reload|reopen|stop|quit  #重新加载配置|重启|停止|退出 nginx 四选一
./nginx -t   #测试配置文件是否有语法错误
为了进一步增加体验感,可以将 nginx 添加到服务管理中,这样就一条指令搞定 nginx 的所有动作了
在 /usr/lib/systemd/system 下创建 nginx.service 文件,并按照下面编辑(路径按实际修改)
# vim /usr/lib/systemd/system/nginx.service

[Unit]
Description=The nginx HTTP and reverse proxy server
After=syslog.target network.target remote-fs.target nss-lookup.target

[Service]
Type=forking
ExecStartPre=/usr/local/nginx/sbin/nginx -t
ExecStart=/usr/local/nginx/sbin/nginx -c /usr/local/nginx/conf/nginx.conf
ExecReload=/usr/local/nginx/sbin/nginx -s reload
ExecStop=/usr/local/nginx/sbin/nginx -s stop
PrivateTmp=true

[Install]
WantedBy=multi-user.target
MariaDB安装配置
yum自带的版本不够高,需要手动添加源,进入/etc/yum.repos.d下,添加CentOS-MariaDB.repo文件,内容如下
# MariaDB 10.3 CentOS repository list - created 2018-05-26 07:55 UTC
# http://downloads.mariadb.org/mariadb/repositories/
[mariadb]
name = MariaDB
baseurl = http://yum.mariadb.org/10.3/centos7-amd64
gpgkey = https://yum.mariadb.org/RPM-GPG-KEY-MariaDB
gpgcheck=1
清除 yum 的缓存并重新建立:yum clean all && yum makecache,之后可以通过yum list --disablerepo=\* --enablerepo=mariadb查看MariaDB源中的软件包。
安装数据库yum install MariaDB-client MariaDB-server MariaDB-devel -y,安装完后可以通过 systemctl 管理。
为了进行初始配置先开启数据库:systemctl start mariadb,然后执行mysql_secure_installation初始化数据库,冒出一堆选择题,按需填写即可
Enter current password for root (enter for none): #第一次安装直接回车

Set root password? [Y/n] Y  #设置root密码并二次确认

Remove anonymous users? [Y/n]   #是否移除匿名用户

Disallow root login remotely? [Y/n]  #是否拒绝root的远程登录

Remove test database and access to it? [Y/n]  #是否删除test数据库

Reload privilege tables now? [Y/n] Y #选择重新加载权限表完成初始化后通过mysql -uroot -ppassword连接数据库
接下统一MariaDB的字符集为utf8mb4(uft8mb4 utf8基础上兼容emoji),修改 /etc/my.cnf 文件,添加
[mysqld]
init_connect='SET NAMES utf8mb4'
character-set-server=utf8mb4
collation-server=utf8mb4_unicode_ci
skip-character-set-client-handshake=true
default-time_zone = '+8:00' # 设定时区,可选,当你的服务器默认是零时区时可以在数据库里校正重载MariaDB:systemctl restart mariadb,进入数据库通过show variables like "%character%";show variables like "%collation%";查看字符集,如果看到以下结果表示设置成功
+--------------------------+----------------------------+
| Variable_name            | Value                      |
+--------------------------+----------------------------+
| character_set_client     | utf8mb4                    |
| character_set_connection | utf8mb4                    |
| character_set_database   | utf8mb4                    |
| character_set_filesystem | binary                     |
| character_set_results    | utf8mb4                    |
| character_set_server     | utf8mb4                    |
| character_set_system     | utf8                       |
| character_sets_dir       | /usr/share/mysql/charsets/ |
+--------------------------+----------------------------+
8 rows in set (0.002 sec)

+----------------------+--------------------+
| Variable_name        | Value              |
+----------------------+--------------------+
| collation_connection | utf8mb4_unicode_ci |
| collation_database   | utf8mb4_unicode_ci |
| collation_server     | utf8mb4_unicode_ci |
+----------------------+--------------------+
如果需要外网连接数据库需要开放3306(默认)端口,并且进入数据库中授权,password为连接密码
GRANT ALL PRIVILEGES ON *.* TO 'root'@'%' IDENTIFIED BY 'password' WITH GRANT OPTION;
flush privileges;
到这里数据库就搞定了,下一个php冲冲冲
编译安装php7
先安装一大堆配置需要的依赖
yum install -y gcc gcc-c++ make \
zlib zlib-devel pcre pcre-devel \
libjpeg libjpeg-devel libpng libpng-devel libwebp libwebp-devel freetype freetype-devel \
libxml2 libxml2-devel glibc glibc-devel \
glib2 glib2-devel bzip2 bzip2-devel \
ncurses ncurses-devel curl curl-devel \
e2fsprogs e2fsprogs-devel krb5 krb5-devel \
openssl openssl-devel openldap openldap-devel \
nss_ldap openldap-clients openldap-serversphp7需要高版本libzip,请参考此文章安装
然后下载源码并解压进入
wget https://www.php.net/distributions/php-7.3.6.tar.gz
tar -zxvf php-7.3.6.tar.gz
cd php-7.3.6
配置参数(下面的已经满足大部分需要了)
# 第2、3、4、5行分别指定安装目录、配置文件目录、运行fpm的用户和组
./configure \
--prefix=/usr/local/php \
--with-config-file-path=/usr/local/php/etc \
--with-fpm-user=www \
--with-fpm-group=www \
--enable-fpm \
--enable-mbstring \
--enable-mbregex \
--enable-inline-optimization \
--disable-debug \
--enable-ftp \
--with-gd \
--with-mhash \
--with-jpeg-dir=/usr \
--with-png-dir=/usr \
--with-webp-dir=/usr \
--with-freetype-dir=/usr \
--with-mysql=mysqlnd \
--with-mysqli=mysqlnd \
--with-pdo-mysql=mysqlnd \
--without-pear \
--enable-sockets \
--with-libxml-dir=/usr \
--with-xmlrpc \
--enable-xml \
--with-zlib \
--with-iconv \
--enable-zip \
--enable-soap \
--enable-pcntl \
--enable-cli \
--with-curl \
--with-openssl \
--enable-fileinfo \
--enable-bcmath \
--enable-shmop \
--enable-sysvsem可能会出现off_t undefined; check your library configuration错误,这时链接一下再重新执行上面的配置
# 添加搜索路径到配置文件
echo '/usr/local/lib64
/usr/local/lib
/usr/lib
/usr/lib64'>>/etc/ld.so.conf
# 更新配置
ldconfig -v成功配置后执行make && make install,等上好一段时间后完成安装。php执行文件在安装目录下的bin文件夹里,为了确认安装成功可以去执行一下它(查看下版本什么的
接下来配置php-fpm,进入php的源码包中cd /usr/local/src/php-7.3.6
找到 php.ini-production,复制到配置文件目录(刚才编译配置 --with-config-file-path指向的目录)下,并改名为 php.ini
cp php.ini-production /usr/local/php/etc/php.iniphp.ini中某些配置可能需要根据自己需求改,这里不详述
然后将 php-fpm 加入启动服务,使其可以通过 systemctl 管理
cp sapi/fpm/php-fpm.service /usr/lib/systemd/system/php-fpm.service弄好 php-fpm 配置文件
cp /usr/local/php/etc/php-fpm.conf.default /usr/local/php/etc/php-fpm.conf
cp /usr/local/php/etc/php-fpm.d/www.conf.default /usr/local/php/etc/php-fpm.d/www.conf
vim /usr/local/php/etc/php-fpm.conf  #去掉 pid = run/php-fpm.pid 前面的分号
到这里 php 部分就弄好了,让 php-fpm 跑起来 systemctl start php-fpm
最后需要回去配置一下 nginx 来支持 php。
#vim /usr/local/nginx/conf/nginx.conf
#找到这一块并取消注释,修改其中的fastcgi_param
        location ~ \.php$ {
            root           html;  #网站根目录
            fastcgi_pass   127.0.0.1:9000;  #php-fpm的默认端口是9000
            fastcgi_index  index.php;
            fastcgi_param  SCRIPT_FILENAME $document_root$fastcgi_script_name;  #需修改
            include        fastcgi_params;
        }
修改完后重启 nginx:systemctl restart nginx,写一个简单的php文件放在网站根目录来验证最终 LNPM 环境
<?php
var_dump(mysqli_connect('127.0.0.1','root','password'));
phpinfo();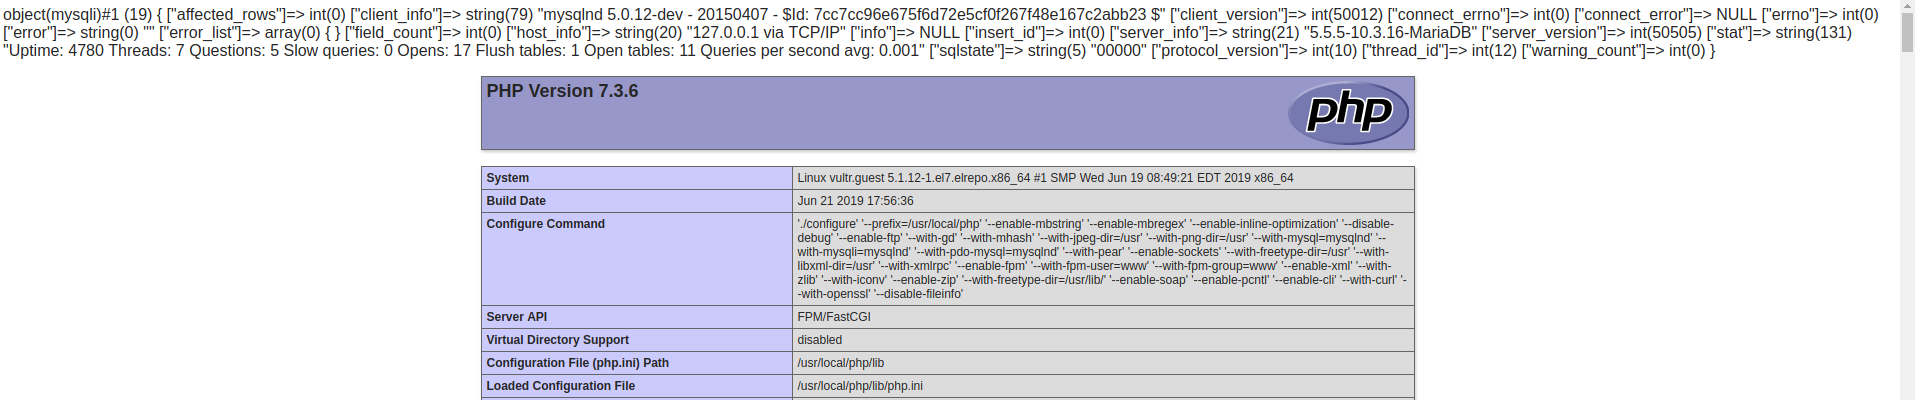
用浏览器访问该php文件,如果有类似以下上的显示,那很不幸的告诉你,折腾完了。剩下一些配置文件的详细设置自己网上学吧,去开始新一轮的折腾吧,我只能帮到这了
噢,对了上面加入了 systemctl 管理的程序有可以设置开机自启 systemctl enable xxx,这样服务器蹦了重启他们会自己跑起来 懒人真好

Comments | ?? 条评论